Tuesday 6 September 2011

A PHP Tutorial

PHP is an excellent server-side technology for dynamic webpage generation. Within a span of few years, it has gained immense popularity among developers. This excellent 5-Part tutorial written by Luigi Arlotta explains the basics of PHP programming. His style is so simple that even absolute beginners would have no trouble following this tutorial.

This tutorial is targeted at those users who may have never programmed using any language before. Also programmers who have experience in other languages can quickly browse through this series and get their PHP code running within minutes...
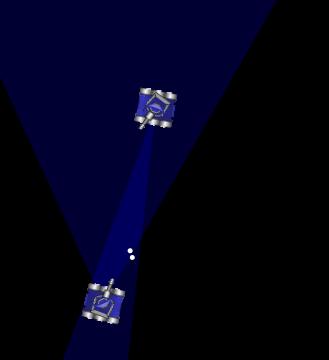
CERIFIACTION TUTORIALS

Tuesday 30 August 2011

TARGETTING

In Robocode, you deplete your opponent's energy and increase your own energy by hitting other bots with bullets. Thus, coming up with targeting algorithms to hit your opponents accurately is a cornerstone of a successful Robocode bot. Different algorithms are more appropriate for different Code Size divisions and styles of play.
The main components of a targeting system are:
  • Choosing a target (Melee only)
  • Energy Management - Whether or not to fire, what bullet power to use
  • Choosing a firing angle
Most descriptions of Robocode targeting systems focus on choosing a firing angle. For a learning gun, this is essentially a classification problem. The enemy robot can't react to where you fired your bullets because he can't see your gun or your bullets (until they hit). He can, however, see when you fire by monitoring your energy.
Some aspects that make Robocode targeting an interesting classification problem are:
  • You have a very small amount of time per tick to make a decision. Dropping in the most sophisticated classification algorithm you can find in a textbook won't work. This time needs to be split between inputting data and generating output values.
  • You have to continually make decisions - when you have no data, when you have 50 ticks, 500 ticks, or 20,000 ticks of data. Your algorithm has to perform well and remain fast enough throughout the entire battle.

MOVEMENTS

In Robocode, you deplete your opponent's energy and increase your own energy by hitting other bots with bullets. Thus, coming up with movement algorithms to keep enemies from hitting you is a cornerstone of a successful Robocode bot. Different algorithms are more appropriate for different CodeSize divisions and styles of play.
Melee and 1v1 are the most explored Robocode rule sets, so most movement algorithms could be categorized as most appropriate for one of them. Other rule sets, like Teams, Twin Duel, Droids, and Virtual Combat add various other elements and borrow from Melee and 1v1 movement styles.
In Melee, besides moving unpredictably, it's also very important to choose a stategically beneficial location. For instance, not being closest to any other bot means that you will likely not be targeted by other bots - this allows you to easily collect survival points and also rack up bullet damage against bots that may not be perpendicular to you, making them easier targets. Corners tend to be coveted positions in a Melee battle. You cannot scan the entire battle field every tick in Melee, and Robocode's bullet hit events only fire for bullets that you fire or that hit you, so you have access to a far lower percentage of the total information in the battle. This makes it difficult or impossible to employ precise forms of bullet dodging in Melee.
In 1v1, a primary differentiator of movements at the highest level is bullet dodging. There are still strategic choices, like distancing, attack angle control, dive protection, and staying out of corners (which can limit your Maximum Escape Angle). But distancing is reciprocal, most decent attack angle control schemes perform similarly, and the benefit of staying far away may offset the negative impact of being cornered. Between gathering scans of the enemy every tick and receiving bullet hit events for every bullet that hits you or the enemy, you have a very high amount of information about the battle. About the only thing you are unaware of is the location of enemy bullets that don't (or haven't yet) hit you. Wave Surfing movements with Precise Prediction put all of this together to dodge bullets with surprising accuracy, especially against simple targeters.
For 1v1 in lower weight classes, like MicroBots and NanoBots, there is not enough room to track all of the data needed for Wave Surfing. Still, Stop And Go movements do a great job of dodging simple targeters like Head-On Targeting, and well tuned Random Movement can make your movement fairly unpredictable even to powerful guns by creating a flat movement profile.

radar

A radar in Robocode can turn a maximum of 45° or π/4rad in a single tick. The radar scans robots up to 1200 units away. The angle that the radar rotates between two ticks creates what is called a radar arc, and every robot detected within the arc is sent to the onScannedRobot() method in order of distance from the scanning bot. The closest bot is detected first, while the furthest bot is detected last. By default, the onScannedRobot() method has the lowest event priority of all the event handlers in Robocode, so it is the last one to be triggered each tick.


For most of these radar locks, you will need to add one of the following to your run() method:
 
setAdjustRadarForRobotTurn(true);
setAdjustGunForRobotTurn(true);
setAdjustRadarForGunTurn(true);


GETTING STARTED

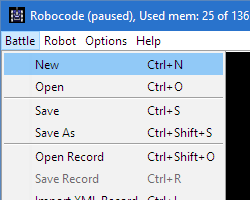
After installation first, let's run a battle to see what the game looks like. Simply click the Battle menu, then select New, as shown on the picture here:
Starting a new battle by selecting New in the Battle menu

You'll be presented with the New Battle screen, where you pick the robots and options for a battle. For this battle, we'll try out MyFirstRobot, RamFire, and Tracker. Add them in by double-clicking on their names (or selecting each one and clicking Add) The screen should now look something like this:
Shows the New Battle dialog where the user can select which robots to add to a new battle
See the Number of Rounds box in the middle?
In Robocode, each battle consists of a number of rounds, as you'll see soon. For now, we'll leave it at the default of 10.
Finally, click on the Start Battle button to begin! Watch for Tracker's little dance as he wins rounds.


COMMAND LINE

 It is possible to specify options and predefined properties from the command-line when running Robocode. The usage of these can be listed by writing this from a command prompt or shell:
robocode -help
For example, it is possible to:
  • disable the graphical user interface (GUI).
  • disable security that is specific to Robocode (but does not override the security that comes with the JVM).
  • enable/disable the debugging mode, useful when debugging robots.
  • play a battle based on an existing Robocode .battle file.
  • replay a recorded battle visually.
  • save the results of battles in a comma-separated file.
You can read more details here:

COMPETITION

If you want to challenge your robot(s) and yourself as robot developer, the RoboRumble@Home is the best way to do it. RoboRumble is the ultimate collaborative effort to have a live, up-to-date ranking of Robocode bots. It uses the power of available Robocoders' computers to distribute the effort of running battles and building the rankings.
RoboRumble is actually 3 different rumbles:
  • RoboRumble (aka 1v1): One robot versus another robot - both picked at random. These two robots a alone on the battle field.
  • MeleeRumble: Ten robots picked at random all battle against each other..
  • TeamRumble: One team versus another team - both picked at random. Each team consists of five or less robots.
In order to get started with RoboRumble, you should read this page:
  • Starting With RoboRumble
Note that the RoboRumble@Home client is built into Robocode and can be started using the batch/shell/command files:

WindowsUNIX / LinuxMac OS
RoboRumbleroborumble.batroborumble.shroborumble.command
MeleeRumblemeleerumble.batmeleerumble.shmeleerumble.command
TeamRumbleteamrumble.batteamrumble.shteamrumble.command
Two other competitions exists which are:
  • Twin Duel: Two teams battle on an 800x800 field. Each team consists of two robots (twins).
  • Hat League: Two teams not knowing each other are paired together at random (like drawing names from a hat). Each team consists of two robots. These two teams must work together and defeat two other teams that have also been picked at random.

CHALLENGES

A good way to improve you self as a robot developer is to try out some real challenges. On the RoboWiki, two famous challenges exist for testing/studying a robots movement, targeting, and gun abilities:
  • Movement Challenge
  • Targeting Challenge
  • RoboRumble Gun Challenge

COMMUNITY

The community around Robocode is using the RoboWiki as communication channel. At the RoboWiki, people share new ideas, code snippets, algorithms, strategies, and lots of other stuff about Robocode. New official documentation from the developers of Robocode will be put at the RoboWiki as well.
On the RoboWiki, these strategies are provided:
  • Radar
  • Movement
  • Targeting
The code snippets are also provided on the RoboWiki:
  • Code Snippets

ROBOCODE REPOSITORY

If you want to try out new robots than the sample robots that come with Robocode, you should visit the Robocode Repository.
Robots are available under the Bots section of the repository.
The Robocode Repository is developed and maintained by David Lynn as a project independently of the Robocode project.

ROBOCODE API

The Robocode API is provided as HTML pages for both the Java and .NET platform.
  • Java API
  • .NET API
  • .NET Control API
The Robocode API actually consists of 3 different APIs.
  • Robot API: Within the Java package robocode and .NET namespace Robocode.
    The Robot API is used for developing robots, and is the only part of the API that robots are allowed to access.
  • Robot Interfaces: Within the Java package robocode.robotinterfaces and .NET namespace Robocode.RobotInterfaces.
    The Robot Interfaces are used for developing new robot types with a different API that the standard Robot API.
    Note: The game rules and robot behaviors cannot be changed.
  • Control API: Within the Java package robocode.control and .NET namespace Robocode.Control.
    The Control API is used for letting another application start up battles with selected robots in Robocode and retrieve the results. It is also possible to get snapshots of robots and bullets (like position, heading, energy level etc.) at a specific time in a battle.


GETTING STARTED

Most documentation about Robocode is provided thru the RoboWiki, which contains the official documentation about Robocode, but which also hosts the community around Robocode. It is highly recommended to read the articles on the RoboWiki for getting started with Robocode. These articles are provided from here:
You should read about the anatomy of a robot, the game physics, scoring etc.

SYSTEM REQUIREMENTS


In order to run Robocode, Java 5.0 Standard Edition (SE) or a newer version of Java must be installed on your system. Both the Java Runtime Environment (JRE) and the Java Developer Kit (JDK) can be used. Note that the JRE does not include the standard Java compiler (javac), but the JDK does. However, Robocode comes with a built-in compiler (ECJ). Hence, it is sufficient running Robocode on the JRE.

Also note that it is important that these environment variables have been set up prior to running Robocode:

JAVA_HOME must be setup to point at the home directory for Java (JDK or JRE).
Windows example: JAVA_HOME=C:\Program Files\Java\jdk1.5.0_22
UNIX, Linux, Mac OS example: JAVA_HOME=/usr/local/jdk1.5.0_22

PATH must include the path to the bin of the Java home directory (JAVA_HOME) that includes java.exe for starting the Java virtual Machine (JVM).
Windows example: PATH=%PATH%;%JAVA_HOME%
UNIX, Linux, Mac OS example: PATH=${PATH}:${JAVA_HOME}/bin

You can read more details from here:

System Requirements

If you want to program robots in .NET or control Robocode from a .NET application, you need to install the Robocode .NET API plug-in on top of Robocode. The plug-in is installed by double-clicking the robocode.dotnet-xxx-setup.jar the same way as Robocode itself is installed.

HISTORY OF ROBOCODE


The Robocode game was originally started by Matthew A. Nelson, aka Mat Nelson, as a personal endeavor in late 2000 and became a professional one when he brought it to IBM, in the form of an AlphaWorks download, in July 2001.
In the beginning of 2005, Robocode was brought to SourceForge as Open Source with Robocode version 1.0.7. At this point, the development of Robocode had somewhat stopped. In the meanwhile, the community around Robocode began to develop their own versions of Robocode in order to get rid of bugs and also to put new features into Robocode, the Contributions for Open Source Robocode and later on the RobocodeNG project by Flemming N. Larsen.
As nothing seemed to happen with Robocode in more than a year, Flemming N. Larsen took over the Robocode project at SourceForge as administrator and developer in July 2006. The RobocodeNG project was dropped, but the Robocode 2006 variant, which contained a lot of contributions from the Robocode community, was merged into the official Robocode with version 1.1. Since then, lots of new versions of Robocode have been released with more and more features and contributions from the community.
Recently (from version 1.7.2.0), the .NET platform is supported through a .NET plug-in provided by Pavel Savara based on jni4net, also developed by Pavel Savara.

WHAT IS ROBOCODE?

Robocode is a programming game, where the goal is to develop a robot battle tank to battle against other tanks in Java or .NET. The robot battles are running in real-time and on-screen.

The motto of Robocode is: Build the best, destroy the rest!

Besides being a programming game, Robocode is used for learning how to program, primarily in the Java language, but other languages like C# and Scala are becoming popular as well.

Schools and universities are using Robocode as part of teaching how to program, but also for studying artificial intelligence (AI). The concept of Robocode is easy to understand, and a fun way to learn how to program.

Robocode comes with its own installer, built-in robot editor and Java compiler, and only pre-requires a Java Virtual Machine (JVM) to exist on the system where it must be installed. Hence, everything a robot developer needs to get started is provided with the main Robocode distribution file (robocode-xxx-setup.jar). Robocode also supports developing robots using external IDEs like e.g. Eclipse, IntelliJ IDEA, NetBeans, Visual Studio etc., which supports the developer much better than the robot editor in Robocode.

The fact that Robocode runs on the Java platform makes it possible to run it on any operating system with Java pre-installed, meaning that it will be able to run on Windows, Linux, Mac OS, but also UNIX and variants of UNIX. Note that Java 5.0 or newer must be installed on the system before Robocode is able to run. See the System Requirements for more information.

Be aware that many users of Robocode (aka Robocoders) find Robocode to be very fun, but also very addictive. :-)

Robocode comes free of charge and is being developed as a spare-time project where no money is involved. The developers of Robocode are developing on Robocode because they think it is fun, and because they improve themselves as developers this way.

Robocode is an Open Source project, which means that all sources are open to everybody. In addition, Robocode is provided under the terms of EPL (Eclipse Public License).

Sunday 28 August 2011

Collections


Collections
A Collection allows a group of objects to be treated as a single unit. Collections define a set of core interfaces. These are -
  • Collection
  • Set
  • List
  • SortedSet
  • Map
  • SortedMap
Collections also provide implementation for these interfaces.

Threads


Threads
A thread is in process in execution within a program. Within a program each thread defines a separate path of execution.
Creation of a thread
A thread can be created in two ways a) By implementing the Runnable interface. The Runnable interface consists of only one method - the run method. The run method has a prototype of public void run(); b) By extending the class Thread.
Execution of a thread
To execute a thread, the thread is first created and then the start() method is invoked on the thread. Eventually the thread would execute and the run method would be invoked. The example below illustrates the two methods of thread creation. You should note that the run method should not be invoked directly.

public class ThreadExample extends Thread {
   public void run() {
      System.out.println("Thread started");
   }
   public static void main(String args[]) {
      ThreadExample t = new ThreadExample();
      t.start();
   }
}
Example - Creation of Thread by extending the 
Thread class.


Declaration and Access Control

Array Fundamentals
Arrays are used to represent fixed number of elements of the same type. The following are legal syntax for declaring one-dimensional arrays.

int anArray[];
int[] anArray;
int []anArray;

It is important to note that the size of the array is not included in the declaration. Memory is allocated for an array using the new operator as shown below.
anArray = new int[10];
The declaration and memory allocation may be combined together as shown below.
int anArray[] = new int[10];
The elements of the array are implicitly initialized to default values based on array types (0 for integral types, null for objects etc.). This is true for both local arrays as well as arrays which are data members. In this respect arrays are different from normal variables. Variable defined inside a method are not implicitly initialized, where as array elements are implicitly initialized.

Array Initializations
Arrays are initialized using the syntax below
int intArray[] = {1,2,3,4};
The length operator can be used to access the number of elements in an array (for example - intArray.length).

Operators and Assignments

Operators and Assignments

Commonly used operators
Following are some of the commonly used JavaTM technology operators - Multiplication (*), Addition (+), Subtraction (-), logical and (&&) Conditional Operator ?:, Assignment (=), left shift (<<), right shift (>> and >>>), Equality comparison (==), Non-equality comparison (!=).

Conversion rules in Assignments
In the description below, I am giving basic conversion rules for assignment when source and destination are of different types.

LANGUAGE FUNDAMENTALS

Language Fundamentals


  1. Identifiers are names of variables, functions, classes etc. The name used as an identifier must follow the following rules in JavaTM technology.
    • Each character is either a digit, letter, underscore(_) or currency symbol ($,¢, £ or ¥)
    • First character cannot be a digit.
    • The identifier name must not be a reserved word.
  2. A keyword or reserved word in Java technology has special meaning and cannot be used as a user defined identifier. The list of keywords in Java technology is given below. It is important to completely remember this list as you can expect a question in Java Certification exam related to this.
    abstractbooleanbreakbytecasecatch
    charclassconstcontinuedefaultdo
    doubleelseextendsfinalfinallyfloat
    forgotoifimplementsimportinstanceof
    intinterfacelongnativenewnull
    packageprivateprotectedpublicreturnshort
    staticstrictfpsuperswitchsynchronizedthis
    throwthrowstransienttryvoidvolatile
    whileassertenum

Friday 26 August 2011

AGLETS

Think of the Internet as a distributed, massively parallel supercomputer that connects information repositories, databases, intelligent agents, and mobile code. Imagine sending your own personalized agents to roam the Internet. They will monitor your favorite Web sites, get you the ticket you couldn't get at the box office, or help you to schedule meetings for your next overseas trip. Sounds like science fiction? Maybe, but at IBM Research we decided to do something about it. Read on and learn about Aglets Software Development Kit from IBM. We are confident that you will be excited about what you discover!
INSTALL AGLETS AND GET STARTED
CLICK TO INSTALL

Installing ANT for Windows 7

1. Download ANT http://ant.apache.org/
2. Unzip it and rename it to ant

3.Set environmental variables JAVA_HOME to your Java environment, ANT_HOME to the directory you uncompressed, to do it on command prompt type this (Assume Ant is installed in E:\ant\.)

set ANT_HOME=E:\ant
set JAVA_HOME=D:\Program Files\Java\jdk1.6.0_03
set PATH=%PATH%;%ANT_HOME%\bin

In windows 7 you can go to Control Panel\All Control Panel Items\System or right click on Computer and then to “Advance system setting”
-Choose Advanced Tab
-Press Environtmen Variables Button
-In the System Variables, click New Button

Give the Variable Name:ANT_HOME
Give the Value: E:\ant
Click OK
Then,we’ll add new ANT_HOME path,
And Click again on New Button if you do not have ‘path’ Variable in there, if so select it and edit as
Give the Variable Name:path
Give the Value D:\Program Files\Java\jdk1.6.0_03\bin;%ANT_HOME%\bin
Click OK

4. Check wheter ANT works correctly or not.
In the command prompt, type:
ant -version

I got Apache Ant version 1.8.1 compiled on April 30 2010

what on you?

set JAVA_HOME envoirment

FOR WINDOWS:
Please follow the instructions to set up JAVA_HOME environment variable in your computer. First find out the installation folder of Java development kit (JDK) in your machine. Let's assume it is installed in the folder "C:/j2sdk1.4.2"

1 Right click on the My Computer icon on your desktop and select properties
2 Click the Advanced Tab
3 Click the Environment Variables button
4 Under System Variable, click New
5 Enter the variable name as JAVA_HOME
6 Enter the variable value as the install path for the Development Kit
7 Click OK
8 Click Apply Changes

FOR LINUX:

Sunday 14 August 2011

Exception in thread "main" java.lang.NoClassDefFoundError


A friend of mine wanted to start to learn java, and I wanted to help him, so we created a simple Hello World example.

public class Hello {

public static void main(String argv[]) {

System.out.println("Hello world !");

}

}

then, when you compile it:

> javac Hello.java

and want to execute it:

> java Hello

Exception in thread "main" java.lang.NoClassDefFoundError: Hello


Tuesday 2 August 2011

The shift operators

The shift operators, >>, >>>, and << work with integer primitives only; 
The >> right shift extends the sign so a negative number stays negative
The >>> operator shifts in zero bits, creating a positive number. 
The << left shift always shifts in zero bits at the least significant position.

GOTO STATEMENT IN JAVA

Java doesn't have a 'goto'

JAVA USES 'LABEL'.

example:


labelA:

// some loop {
    continue labelA;
}


There is no goto e (though the the keyword is reserved), but break
and continue statements cause unconditional branching in more
restrictive contexts. You can combine them with statement labels to
achieve many of the effects that it is reasonable to want goto for. As
Stefan Ram pointed out, a switch block or a throw statement also produce
branching. So does a try/catch/finally, an if, a for or while loop, or
a method invocation.
 

It would be better if you can design your program so it not need to use a goto statement because it was considered not as a good practice in programming.


Monday 1 August 2011

SCJP DETAILS

 The Oracle Certified Associate, Java SE 5/SE 6 certification provides an ideal entry into an application development or a software project management career using Java technologies. This worldwide credential validates basic knowledge of Object-Oriented Concepts, UML representation of OO concepts, the Java programming language, and general knowledge of Java Platforms and Technologies. Candidates for this exam include: entry level Java programmers, students studying to become Java programmers, project or program managers working with Java technology in the software development industry.


Formerly Sun Certified Java Associate (SCJA)
Exam Number: 1Z0-850
Associated Certifications: Oracle Certified Associate, Java SE 5/SE 6
Exam Price: Rs 5845
More on exam pricing
Exam Registration: Register
 
Duration: 115 minutes
Number of Questions: 51
Passing Score: 68%
 

File Handling

File Handling and Input/Output

java.io package
Classes related to input and output are present in the JavaTM language package java.io . Java technology uses "streams" as a general mechanism of handling data. Input streams act as a source of data. Output streams act as a destination of data.

Sun Certified Java Programmer

The SCJP exam is primarily for programmers interested in demonstrating proficiency in the fundamentals of the Java programming language.

The certification tests the programmer if he/she understands the basic syntax and structure of the Java programming language and if he/she can create Java technology applications that run on server and desktop systems using J2SE.

ARRAYS

An array is a group of variables (called elements or components) containing values that all have the same type. Recall that types are divided into two categoriesprimitive types and reference types. Arrays are objects, so they are considered reference types. As you will soon see, what we typically think of as an array is actually a reference to an array object in memory. The elements of an array can be either primitive types or reference types . To refer to a particular element in an array, we specify the name of the reference to the array and the position number of the element in the array. The position number of the element is called the element's index or subscript.
Java Arrays (Single Dimensional Arrays)
  • An array is a sequence of variables of the same data type (homogenous).
  • The data type can be any of Java�s primitive types or a class (user-defined as well).
  • Each variable in the array is an element.
  • We use an index to specify the position of each element in the array.
  • Arrays are useful for many applications, including calculating statistics or representing the state of a game.
  • Arrays are always homogeneous, or of the same data type.
  • Array indexes always begin with zero (0).
  • Declaring and instantiating arrays
  • In Java Arrays are objects, so they need to be declared and instantiated
  • Types get default values inside the array, just as they do during normal instantiation. Examples:.   Java Text Books
    int[] array;
    int[] array = new int[9];
    int[] array = {1,2,3,4,5};
    Auto[] array = {new Auto()}; 

     
Declaring arrays:
double [] dailyTemps; // elements are doubles
String [] cdTracks; // elements are Strings
boolean [] answers; // elements are booleans
Auto [] cars; // elements are Auto references
int [] cs101, bio201; // two integer arrays

Instantiating these arrays:
dailyTemps = new double[365]; // 365 elements
cdTracks = new String[15]; // 15 elements
int numberOfQuestions = 30;
answers = new boolean[numberOfQuestions];
cars = new Auto[3]; // 3 elements
cs101 = new int[5]; // 5 elements
bio201 = new int[4]; // 4 elements

Initialization List
The initialization list can only be used when instantiating the array, trying to do so after initialization will cause a compilation error. Example: int[] array = {1,2,3,4,5};
Aggregate Array Operations
- You can perform the same operations on arrays as we do on a series of input values.
- To perform an operation on all elements in an array, we use a for loop to perform the operation on each element.
in turn. For Example tp print all elements of an array:
for(int i=0; i<array.length;i+) {
System.out.println(cellBills[i]);
}

Reading Items Into Array
import java.util.Scanner;
public class GetArrayValues
{
public static void main( String [] args )
{
Scanner scan = new Scanner( System.in );
double [] scores = new double[6];
for ( int i = 0; i < scores.length; i++ )
{
System.out.println( "Enter Score: "
+ ( i + 1 ));
scores[i] = scan.nextDouble( ); // read current bill
}
}
}

Thursday 28 July 2011

A program to find ip address of the website

import java.net.*; //for networking
import java.io.*; //for input/output operations
import java.util.Scanner; // for taking user input

Control Structures in java

  for  Repetition Statement

 The while statement can be used to implement any counter-controlled loop. Java also provides the for repetition statement, which specifies the counter-controlled-repetition details in a single line of code. 
 
1  //for loop
 2  //Counter-controlled repetition statement.
 3
 4  public class ForCounter
 5  {
 6     public static void main( String args[] )
 7     {
 8        // for statement header includes initialization, 
 9        // loop-continuation condition and increment     
10        for ( int counter = 1; counter <= 10; counter++ )
11           System.out.printf( "%d  ", counter );         
12
13        System.out.println(); // output a newline
14     } // end main
15  } // end class ForCounter

How to be a certified programmer


Java Certification FAQ

          Frequently asked Questions on Java Programmer Certification 


1.1) What Java Certifications exist?

1.2) What are the benefit of becoming certified and how much more will I get paid?

1.3) What happens when new versions of the exam come out

1.4) Is the rumor about certification true?
 

ADDING TWO NUMBERS WITH USER INPUT

// Addition program that displays the sum of two numbers.
import java.util.Scanner; // program uses class Scanner
  
public class Addition
   {
   // main method begins execution of Java application
 public static void main( String args[] )
  { // create Scanner to obtain input from command window 

   Scanner input = new Scanner( System.in );             
   int number1; // first number to add    
   int number2; // second number to add   
   int sum; // sum of number1 and number2

 System.out.print( "Enter first integer: " ); // prompt
 number1 = input.nextInt(); // read first number from user 
System.out.print( "Enter second integer: " ); // prompt 
 number2 = input.nextInt(); // read second number from user 
 sum = number1 + number2; // add numbers     
 System.out.printf( "Sum is %d\n", sum ); // display sum 
} // end method main 
} // end class Addition

Introduction to Java

First Program in Java: Printing a Line of Text

 
// Text-printing program.
public class Welcome1
   {
      // main method begins execution of Java application
     public static void main( String args[] )
      { 
    System.out.println( "Welcome to Java Programming!" ); 
 
} // end method main 
} // end class Welcome1